Showing posts with label Windows. Show all posts

Tuesday, November 17, 2015

Windows 7 Startup Looping Infinitely

*** Feel free to jump to the end of this page for the potential solution ***

I have been neglecting to help anyone to reformat their laptop. Installing Windows used to be an easy and straight forward job. Ten years ago you probably need 4 parts: Get a working Windows installer, Format the desire partition, re-install windows, install utility drivers (come along with your laptop in a CD)

But now, you no longer get the Utility CD when everything just a click away. Maybe few clicks away...

Back then, all laptops more or less the same. What made it difference are the specs, what's the CPU used, RAM and hard disk capacity, graphic card etc. But today, with product differentiation, by making the product unique and attractive to consumers, a laptop no longer just about its hardware specification and operating system. 

I only have one windows laptop which is by Acer. I'm pretty happy with. I got it slightly cheaper than the retail price because it was open OS. Meaning the shop that sold it to me installed a non-genuine Windows for me to get started. I don't mind. Acer's laptop in 2009 have another feature called Empowerment Technology (if I'm not mistaken hehe). However that function on my keyboard never seems to response every time I press on it. And yeah 7 years later I still have no idea what I missed from not having this feature on my Acer. 

On the contrary, that could be what I gain. I lost count on how many times I formatted this Acer laptop and I never really encountered any weird problems. It usually took me maximum of 1 hour to format and reinstall, get it up and running like new. 

But hell, yesterday I spent more than 10 hours just to re-install Windows 7 on an Asus laptop. 7 years ago, my Acer was differentiated by one feature, which I happy not to have. But Asus today ... wow. All I can is you should leave formatting a laptop to the professional technician. Where they have all the necessary utility drivers and  access to fast internet in case they need to look for one. 

Ok, so when I almost finish installing Windows 7 on Asus, as usual I get the message that the system will restart several times to complete the installation. And I was like.. Ok.. whatever, just get it done. 

The system was not just restart like 5, 6 or 7 times, but I lost count. I checked my timer, this is unusual. It has been more than an hour and still not done? I was reinstalling about 3 or 4 times, trying both 32 and 64 bit. Then I know I fall into the startup loop. What I can observe: boot up > "windows is loading files" > windows logo > Asus background > boot up

I was googling around and found some commands to try, but to no avail in my case. 

Anyway you may check out this link first, it may work for you, but if NOT, try the steps below :
  1. Boot up using your windows installer
  2. Click repair/ system recovery options
  3. Choose command prompt (If your path is X:\Sources,set it to C, just type C:)
  4. Type the following command
bootrec /fixmbr 
bootrec/fixboot 


It's true everything is just one click away, but the RIGHT solution could be 1000 clicks away.

Wednesday, May 6, 2015

Setting Windows 7 Environment Variable for SUMO

When you try to run SUMO command in cmd for the the first time, you may get the error
'netconvert is not recognized as an internal or external command, program or batch files'

To run all sumo command comfortably, we want to set the path variable. Of coz you still can run SUMO command if you put all your files in sumo\bin directory. Refer Fig.1

Fig.1: Also can run SUMO command without setting the path

Ok, but I'd like to have all my works organized. So let's set the path, just like any other programming language interpreter (Java, Python, etc...).

  1. Open system properties
  2. Advanced system settings
  3. Click on environment variables @ bottom right
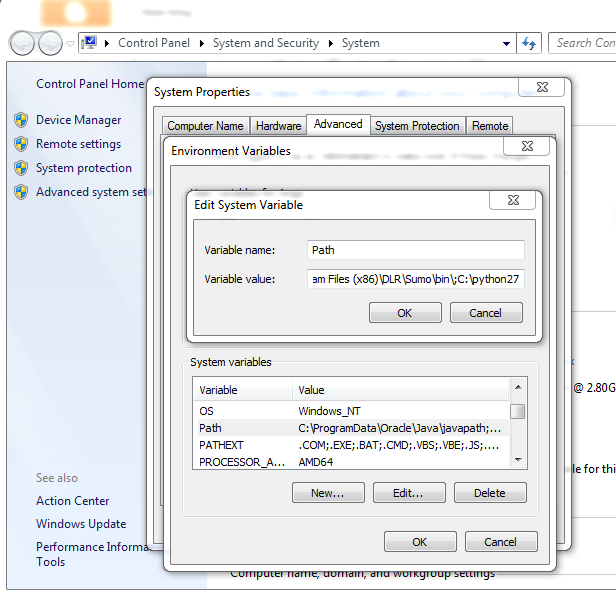
  4. Edit the path by append ";C:\sumo-0.19.0\bin" (replace C:\sumo-0.19.0\bin with your SUMO directory). Refer Fig.2
  5. Restart cmd
Fig.2: Append 'C:sumo-0.19.0\bin'. Make sure no space.


Fig.3: Successfully run 

Wednesday, April 29, 2015

Windows Pop up - Do you want to allow the following program to make changes to your computer

One of the annoying pop-up in Windows

"Do you want to allow the following program to make changes to your computer"

This alert pop-up everytime I open a word document, whether the answer is yes or no, the pop up continue with another " There was a problem sending the command to the program".


Fix:

Firstly, verify that Word isn't being automatically started within Admin Mode
Right Click on the word exe file ->Properties->Compatibility Tab->Privilege Level. 
Check Run as Administrator is unchecked.

If it already is, or this doesn't rectify the issue, check Microsoft Office Compatibility.
  1. Open Microsoft Office Properties
  2. On Compatibility Tab, check the Compatibility mode is set to your operating system. Mine by default is set to Windows (SP3). Change to Windows 7


Thursday, April 23, 2015

Running Java code and setting its environment variable in Windows 7

You may download Java Development Kit here. Accept the license agreement and choose your system. I'm using Windows x64 (for 64 bit, you may also choose Windows x86 to run 32 bit system)


Setting Windows 7 environment variable for Java
To do this:
  1. Open system properties
  2. Advanced system settings
  3. Click on environment variables @ bottom right 
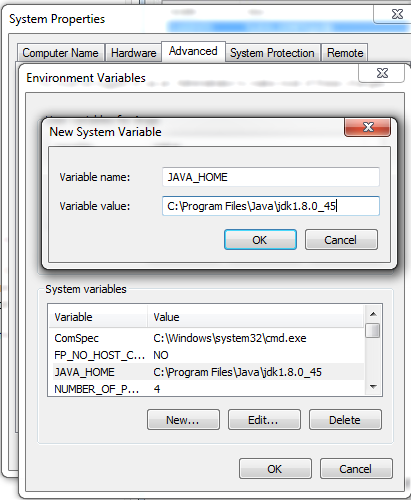
  4. Click 'New' to create new system variable (Variable name: JAVA_HOME, Variable Value: C:\Program Files\Java\jdk1.8.0_45), then click 'ok'.
  5. In system variables, scroll down and look for "path"
  6. Edit the path by append ";%JAVA_HOME%\bin"
  7. Restart cmd
Step 4: Create new system variable

Step 6: Append the path

Tuesday, April 7, 2015

MacFan For Windows Temperature Control in Bootcamp

This apps is simple and useful to control the speed of your fan in bootcamp. Apparently the fan control in Windows Bootcamp is not as good as in OSX.

2 apps to download:

  1. Core Temp - for temperature readings
  2. MacFan - to set the fan speed (run as admin in comand prompt)

Steps:
1. Extract the MacFan zip file.
2. Run cmd as admin
3. Navigate to MacFan directories in cmd (my MacFan folder located in Downloads folder)
Downloads\MacFan0_65\MacFan0_65\MacFan0_65\MacFan.exe
You can see the number of fan you have, and the minimum and maximum fan speed. In my case, I have 1 fan, min of 2000 rpm and, max of 6200 rpm.
1 fan, min=2000 rpm, max= 6200 rpm

4. Now we want to set our fan speed manually (press arrow up, for previous command), say 3000 rpm

Downloads\MacFan0_65\MacFan0_65\MacFan0_65\MacFan.exe 3000

Setting fan to 3000 rpm


That's all!

Remarks:

  1. Restarting your system will put the fan speed to default.
  2. At 3000 rpm my core temp was > 60 Celsius in idle. I reset the fan speed to 4000 rpm to keep the core temp below 60 Celsius (I run heavy image processing and simulation)

Monday, March 23, 2015

Vehicular Traffic Simulation Using SUMO (Windows based)

A: Getting Your System Ready
First, you need to download the following:
SUMO 0.22.0 (but I changed to SUMO 0.19.0 later on)
Python 2.7.0 (I tried Python 3.6 but got errors)
JOSM (optional)

Before we move on...
You might want to get familiar with running programs from the windows command line (cmd). Check the common command such as cd, dir, etc..

Also, Python scripts have to be processed by another program called the Python Interpreter. The Interpreters read the scripts, compiles it into bytecodes, executes the bytecodes to run the program. So, we have to make sure the command window recognises the word "python" as an instruction to start the interpreter. 

Let's say if you entered the command python and hitting return, you should see the version of the Python installed in your system, but.. If you see something like :

'python' is not recognized as an internal or external command, operable program or batch file.

Then you have to make sure your computer knows where to find the Python interpreter. 
To do this:
  1. Open system properties
  2. Advanced system settings
  3. Click on environment variables @ bottom right 
  4. In system variables, scroll down and look for "path"
  5. Edit the path by append ";C:\python27"
  6. Restart cmd
No space at all ";C\python27"


B: Simple Traffic Simulation

After you have done all the above, use the following steps to create a simple vehicular traffic simulation in SUMO.


1. Export (download) the OSM map. I rename my map to tfs.osm and put all simulation-needed files in one directory, named tfs.

2. In windows terminal, cd to tfs directory.

3. Enter 
netconvert --osm-files tfs.osm -o tfs.net.xml
4. Add polygons features to be displayed in sumo-gui. (You may copy typemap_example.xml script from sumo installation file itself into your working directory, and renamed to typemap.xml. Mine located at C>ProgramFilesx86>DLR>Sumo>tools>import>osm). In terminal, enter 
polyconvert --net-file tfs.net.xml --type-file typemap.xml -o tfs.poly.xml
After run, a file named "tfs.poly.xml" will be created in tfs directory.

5. Next, we want to generate random vehicular routes. Enter 
python randomTrips.py-full-path -n tfs.net.xml -e 50 -l 
if no error, then enter
python randomTrips.py-full-path -n tfs.net.xml -r tfs.rou.xml -e 50 -l 

(You may drag&drop randomTrips.py full path to terminal. Mine located at C>>sumo-0.19.0>tools>trip).

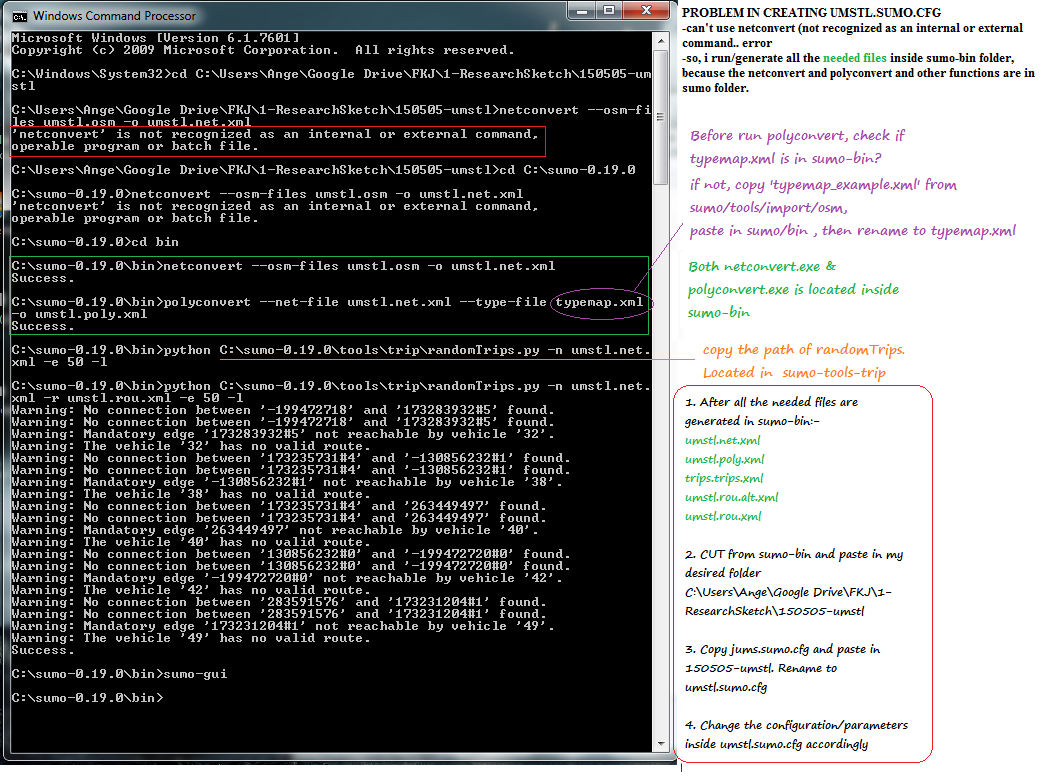
Step 5:
Post edited on 02/06/15, coz I find this step abit confusing (regarding randomTrips.py full path).
This figure is based on another example ysgbridge.osm.


6. Save the following script as tfs.sumo.cfg. Replace "tfs" to your own file name.
<configuration xmlns:xsi="http://www.w3.org/2001/XMLSchema-instance" xsi:noNamespaceSchemaLocation="http://sumo.sf.net/xsd/sumoConfiguration.xsd">
    <input>        <net-file value="tfs.net.xml"/>        <route-files value="tfs.rou.xml"/>        <additional-files value="tfs.poly.xml"/>    </input>
    <time>        <begin value="0"/>        <end value="1000"/>        <step-length value="0.1"/>    </time></configuration>

7. Finally, enter sumo-gui


7 files will be created from all the steps above

Disclaimer: This post is based on a very helpful SUMO tutorial on Linux . Check it out here.

Other useful links:
Python on Windows FAQ
Sumo, randomTrips.py