Thursday, December 1, 2016

Asics Penang Bridge International Marathon 2016

Date: 27 Nov 2016
Distance: 42.195 km
Goal: To finish sub 6:00

Some introduction
My previous full marathon, also the one that I lost my virginity to was Standard Chartered KL marathon. It was a very well organised and I'm happy to be part of it. Kudos to the organiser. I finished it with gun time 06:26:36.38 (net time: 06:24:35.74). I figured I can finish APBIM with sub 6 since it is kinda flat compared to SCKLM. 

The night before ...
I was staying at a friend's place in USM, which is more than 4km away from the start line (at Queensbay mall). I would prefer to walk to the start line, as part of my warm-up and also to avoid any bad traffic during that rush hour. So I checked in myself to the nearby hotel/hostel. Because of some mishaps with other friends and delayed booking, the nearest that still available was Island hostel. The hostel is about 2.5km from Queensbay, not the distance that I expected and the only bed left was in the mixed dormitory. I thought to myself, what the hell, I just plan to nap from 6pm to 11:30pm. 

Wednesday, November 16, 2016

Rumah Roso in Yogyakarta

We were in Jogja for a really short duration (2 nights) coz our sole purpose was Borobodur. We arrived in Jogja pretty late too, about 5pm. We will only need the basic, such as:

  1. Bed
  2. Shower (unattached bathroom is ok)
  3. Good location

Although we would be happy to settle for the basic, but Rumah Roso offers much more. It is a steal.

Properties:
Rumah Roso Homestay
Jalan Langenarjan Kidul No. 5B - Panembahan Kraton
Mantrijeron, 55131 Yogyakarta, Indonesia
Phone: +62811293034
GPS coordinates: S 007° 48.821, E 110° 21.794

Tuesday, November 15, 2016

Indonesia Trip Summary

With MYR getting lower each day, I thought travelling to Indonesia would be the best idea 😅. At the time of writing, the exchange rate for MYR10 = Rp30,769.

Travel itinerary

Day 1 - Arrival in Adisucipto International Airport, Yogyakarta and check in Rumah Roso
Day 2 - Borobodur
Day 3 - Sultan Palace and Taman Sari. Take night train to Bandung.
Day 4 - Check in Elenor's Home
Day 5 - Hang out with friends
Day 6 - Tangkuban Parahu and Sari Ater Hot Spring
Day 7 - Take bus (CityTrans) to Jakarta. Check in Tomang Residence
Day 8 - Ancol
Day 9 - Depart from Soekarno-Hatta International Airport - T2, Jakarta

Training for TMBT 2016 30K Race

I occasionally jungle trekking and hiking since I was kid. So I think I'm pretty good with forest and nature and I LOVE hanging bridge. I don't run a fast marathon but I know my body can take the beating for 6 hours and more =) Thus, I figured for the TMBT 30K with 10 hour cut off time should be doable. 

People keep telling us TMBT (The Most Beautiful Thing) is very extreme and hard. Harder than BUTM (Borneo Ultra Trail Marathon). But then I've got nothing to compare to am I 😁 ?

So, this is what I did. After finished SCKLM (7th August - Standard Chartered KL Marathon) in August, rested for 2 weeks, easy jog for another 2 weeks (completing 100 km/month challenge), then ran KKCIM half marathon (4th Sept - Kota Kinabalu City International Marathon). I don't think introducing a new routine to my training is a good idea when I still have few road running races line up. 

We used 1 month and a half for hiking and trail running. I wish I could have more training but my schedule not permitted. We tried out several hills for trail running but most hills are too steep like Bukit Perahu. Bukit Padang is a good choice too but not too fond of that area.

Monday, November 14, 2016

TMBT 2016 - 30K Race

Date: 29 Oct 2016
Horizontal: 30km
Vertical: Elevation gain 2000m; elevation loss 1185m
Goal: To finish within the 10 hour cut off time

Spoiler alert: TMBT was the brutal and extreme day I've had. Although I didn't finish within the cut off time but I'm so proud of myself I FINISHED! If there's anything brutal than this, then I think it would be the TMBT 50K and 100K race LOL ~

Some introduction
TMBT (The Most Beautiful Thing) referring to the experience on a race course that not only takes your breath away in the land below the wind, Sabah, but leaves you with an experience to remember a lifetime. That's certainly true. TMBT distances this year were 12, 30, 50 and 100 KM. Some would think trail races are more difficult than road races because you are not in a controlled environment. The terrain is uneven, you might run into trees, fall into river, chased by dogs/cows, stung by bees ... the list could go on. But I would beg to differ, I don't think I would ever able to run a road ultra marathon. That would be a mind numbing torture experience for me. Of coz everyone is different. Most trail runners will tell you TMBT is the hardest trail race ever in this region, some international trail runners even flew to Sabah coz it is the hardest. I wouldn't know coz I have nothing to compare to. So is it wise to register myself for the hardest trail race? I don't know, you never know how far you can push your limit. I thought if I can do a full road running marathon, then maybe I can just dial down the trail race to 30K? 

Wednesday, August 31, 2016

How to replace audio downloaded from Youtube (iMovie)

So I downloaded few videos from Youtube, but some of the audio is muted due to copyright issue.

Using iMovie:

1. Import video and audio you going to use into iMovie. You can use the button 'Import' or just drag
2. Select entire clip & drag the video to timeline.
3. Select the video and goto menu Modify > Detach audio
4. Select entire clip of your intended audio & drag to timeline
5. Trim & sync accordingly
6. Share and done =)

Monday, June 20, 2016

How to stop error ‘Sorry, iCloud drive isn’t compatible with OS X Mavericks’

I still using Mavericks, although everyone have jump on El Capitan. Anyway to cut the story short, I already have a perfect platform to run my research simulation, perfect compatibility and don’t need extra stuff/features atm. So, how to stop this error every time you launch Keynote, Pages and Numbers?

Thursday, March 3, 2016

Wednesday, February 24, 2016

Re-sync Subtitle using SubFix - 5 Steps

After a long wait, I finally finish downloaded all Frasier show. This is a great sitcom, it's just funny and enriches my vocabulary along the way. But I can't find any subtitle source that sync perfectly. I can live without the subs for a season or two, but I have 9 seasons without subtitles (season 3 - 9). I know I'm gonna miss a lot, especially with Frasier and Niles way of speaking. Long story short, I checked out subscene.com, addic7ed.com and tvsubs.net, but they all having the exact same version that out of sync. Some video and audio can be easily synced by just tweak the delay once or twice throughout the movie, but no this time, I have to re-sync every line of the text. Kinda pointless I say. After a short google, I found the perfect apps to re-sync sub easily and SAVES it =)

Let me introduce you the awesome SubFix. In only takes 5 easy steps to watch your movie with perfect sub.

Tuesday, February 23, 2016

Control Structure in Swift

We usually used the common control structure in our programming. This post will cover 3 basic common structure in Swift; if else, for loop and while loop

if else
Eg: Create a program that checks if the user enter the correct password for a particular user.

var name = "Ange"
var pw = "password"

if name == "Ange" && pw == "password" {
    print("Welcome " + name + ", you have entered the correct               password")
    }

else if name != "Ange" && pw != "password" {
        print("You have entered the wrong username and wrong                 password")
    }

    else if pw != "password" {
            print("You have entered the wrong password")
        }

        else {
            print(("You have entered the wrong username")
            }

if else statement


for loop
Eg1: Print even number from 1 to 10

for var i = 2; i <= 10; i = i + 2 {
    print(i)
    print("\n")
}
for loop

Eg2: Create an array and divide all the elements in array by 2. Print the result.

var myArray = [2, 4, 8]

for [index, value] in enumerate(myArray} {
    myArray[index] = value / 2
}
print(myArray)
for loop to access elements in an array


while loop

Eg: Create an array with 7 elements and subtract 2 from each of them.

var myArray = [2, 4, 8]
var i = 0

while i < myArray.count {
    myArray[i] = (myArray[i] - 2)
    print(myArray)
    print("\n")
}

while loop

Monday, February 22, 2016

Create Video from Still Images using iMovie 10.0.5

I wanted to create an animation of tailgating vs smooth cruising driving from still images. After search around, the free alternative for a Mac user like me is iMovie. I can't find much tutorial for the new iMovie in Mavericks, so I thought I should put one up here.

The most important thing here is to prepare your still images. I miss Paint in Windows system, but the next best option I have for Mac is Preview. Check out here how I prepare my still images.

Steps:

1. Lauch iMovie
So many buttons. You can see on the left panel, All Events and All Projects. It was quite confusing for me at first. What do I want to create here? A movie? project? or event? 'Events' are kinda like the main folder/categories for the movies you created. Projects are all the stuff you have created in iMovie, basically your movies. Feel free to correct me if I'm wrong =)

Eg: I went to Taiwan last May 2015. So I may create an event named 201505-Taiwan. Under the event 201505-Taiwan, I may have create movies such as: 150513-Taipei101.mp4, 150514-TaipeiZ00.mp4, 150515-RaoHeNightMarket.mp4.

In this figure below, I have an event called 160219-FKJ, I will saved all movies created for my research purpose under this event.
iMovie 10.0.5

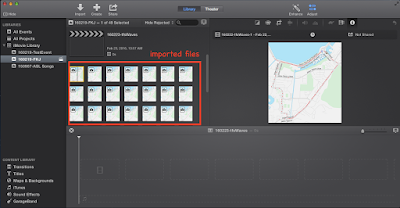
Step 2: Import images
Once you have created/choose the event, then we can import the still images for our movie. Click on the button Import at the top and navigate to your images. If you have lots of images, I would suggest to name your files accordingly. I have certain naming conventions for all the 49 images below.
Import still images


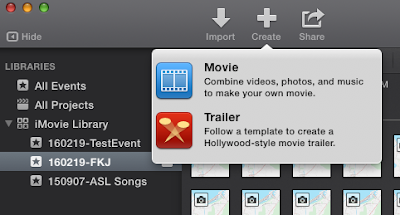
Step 3: Create movie
Now we can create our movie. Simply click on the '+' button at the top. I usually choose no theme for a simple academic animation. 

Create movie

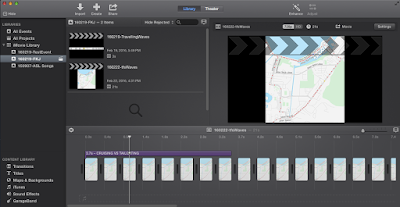
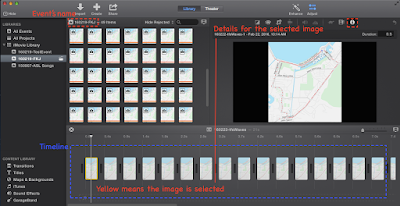
Step 4: Adding images to the movie
You can drag the imported images to the timeline below. But make sure you know which image is which. When you selected an image in the timeline, the info of the selected image will show on the right panel. If you can't see this, click on 'adjust' --> 'circled-i'. In my case, I will drag the images accordingly(160222-tfsWaves-1 to 160222-tfsWaves-49)

Adding images to movie

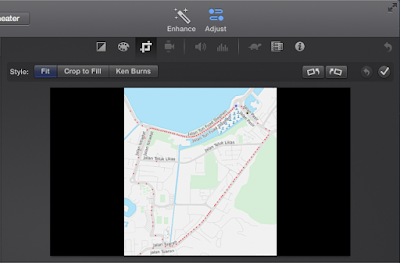
Step 5: Cropping style
Once you have selected all the images, Select-All (Ctrl-A) to set the size of your images. By default the cropping style is set to 'Ken Burns'. I'm just gonna change all to 'Fit'. You can play around to see what style fits your movie
Cropping style

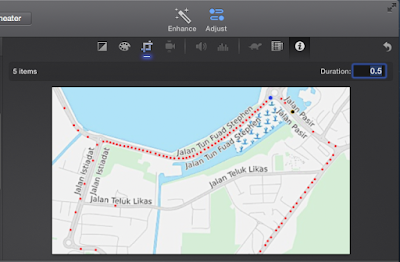
Step 6: Setting frame duration 
To set your frame duration, Select-All (Ctrl-A), click on the circled-i on top. You can set as fast as 0.3 secs per image( that's the lowest you can go). I'm just gonna set mine 0.5.

Setting frame duration

Step 7: Test movie
You can start playing the movie from start or any sections you want. At the timeline, simply bring the vertical lines to the position you want and hit Spacebar (to start or pause).
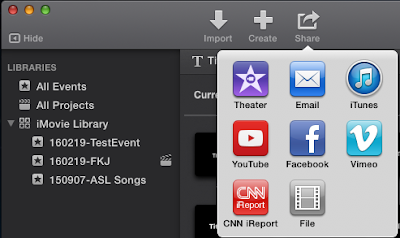
Step 8: Save movie
Once you are satisfied, click on the 'share' button. I'm just gonna choose to save it as a file on my desktop.
Share/save movie.
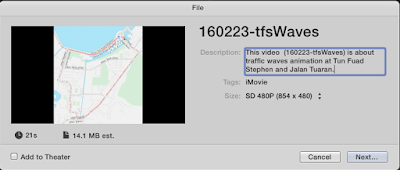
 Add description and select movie size

That's it. Voila! You can use the same steps for adding/combining videos too. Of course there are many other things you can add in iMovie, but once you get familiar with the interface, the rest pretty straight forward. It wasn't that hard actually, but it put me off for few years from using it. 

I hope this helps and feel free to comment below. Thanks.

Some remarks:
Some other basic features you might need are at the lower left panel. 

  • Transitions - Some nice effect for images/videos transitions
  • Titles - Titles
I never try what's iTunes and GarageBand for so I'll just leave it.

I used HandBrake to compress video size, and QuickTimePlayer to fix upside down video.


Wednesday, January 6, 2016

Create Simple GUI in Matlab

It's always easier if you can put your Matlab coding in GUI. Especially if you have lot of functions, you can use different push-buttons for each functions. This post will guide you to create a simple GUI, consists of your program title, push-button for function, axes to display your simulation/results.

Steps:

1. In Matlab Command Window
>> guide
choose 'Blank  GUI (default)
2. A window will pop-out, you can design your GUI anyway you like. I usually keep it simple. There are 3 basic things you need for a basic GUI:

  • Static text - optional but I like to have title for all my programs (double-click to access the properties)
  • Push button - I used 2 push buttons, for 'Run' and 'Stop' (double-click to access the properties)
  • Axes - this is where your simulation shown. You can set your Axes to have toolbar
Some note on Axes: I usually have toolbar for Axes, so I can navigate to each pixels and get their information, or zoom in and out. 
To customise your Axes toolbar:
  1. Single left-click on Axes 
  2. Click 'Tools' on the menu
  3. Select 'Toolbar Editor'
  4. Drag the following to the top: Pan, zoom in, zoom out, data cursor (you can customise to your liking)
Building Matlab simple GUI

3. Rearrange and resize your window GUI accordingly. Save your GUI.

4. Once you save your gui (.fig file) an m-file will be automatically generated (the .fig and .m file will have the same name)

5. Open the GUI's m-file, and copy-paste each m-files function to each designated buttons. For instance, the 'Run' button is  under function pushbutton1_callback(hObject, eventdata, handles). I can put all my code under this button.

The 'Stop' button is under function pushbutton2_Callback(hObject, eventdata, handles). I already set my 'Run' button to execute a while loop (eg: while stop==0), so I can set my 'Stop' button as following.

push-button 'Stop'

Basic GUI