A: Getting Your System Ready
First, you need to download the following:
First, you need to download the following:
SUMO 0.22.0 (but I changed to SUMO 0.19.0 later on)
Python 2.7.0 (I tried Python 3.6 but got errors)
JOSM (optional)
Before we move on...
You might want to get familiar with running programs from the windows command line (cmd). Check the common command such as cd, dir, etc..
Also, Python scripts have to be processed by another program called the Python Interpreter. The Interpreters read the scripts, compiles it into bytecodes, executes the bytecodes to run the program. So, we have to make sure the command window recognises the word "python" as an instruction to start the interpreter.
Let's say if you entered the command python and hitting return, you should see the version of the Python installed in your system, but.. If you see something like :
'python' is not recognized as an internal or external command, operable program or batch file.
Then you have to make sure your computer knows where to find the Python interpreter.
To do this:
To do this:
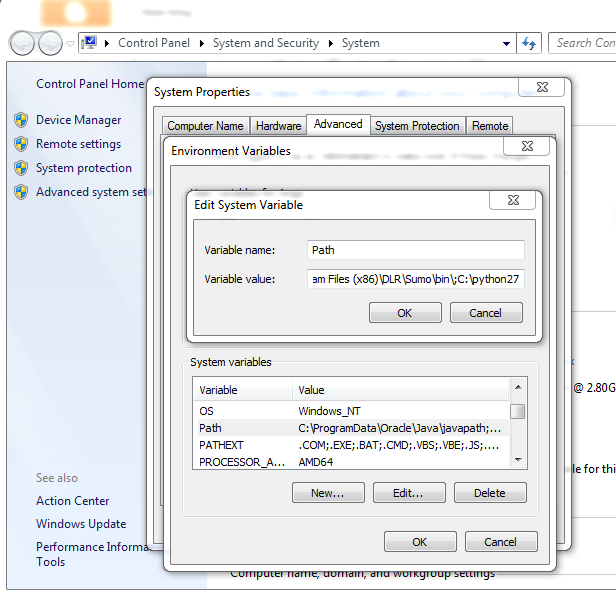
- Open system properties
- Advanced system settings
- Click on environment variables @ bottom right
- In system variables, scroll down and look for "path"
- Edit the path by append ";C:\python27"
- Restart cmd
 |
| No space at all ";C\python27" |
B: Simple Traffic Simulation
After you have done all the above, use the following steps to create a simple vehicular traffic simulation in SUMO.
1. Export (download) the OSM map. I rename my map to tfs.osm and put all simulation-needed files in one directory, named tfs.
2. In windows terminal, cd to tfs directory.
3. Enter
netconvert --osm-files tfs.osm -o tfs.net.xml4. Add polygons features to be displayed in sumo-gui. (You may copy typemap_example.xml script from sumo installation file itself into your working directory, and renamed to typemap.xml. Mine located at C>ProgramFilesx86>DLR>Sumo>tools>import>osm). In terminal, enter
polyconvert --net-file tfs.net.xml --type-file typemap.xml -o tfs.poly.xml
After run, a file named "tfs.poly.xml" will be created in tfs directory.
5. Next, we want to generate random vehicular routes. Enter
python randomTrips.py-full-path -n tfs.net.xml -e 50 -lif no error, then enter
python randomTrips.py-full-path -n tfs.net.xml -r tfs.rou.xml -e 50 -l
(You may drag&drop randomTrips.py full path to terminal. Mine located at C>>sumo-0.19.0>tools>trip).
 |
| Step 5: Post edited on 02/06/15, coz I find this step abit confusing (regarding randomTrips.py full path). This figure is based on another example ysgbridge.osm. |
6. Save the following script as tfs.sumo.cfg. Replace "tfs" to your own file name.
7. Finally, enter sumo-gui
Disclaimer: This post is based on a very helpful SUMO tutorial on Linux . Check it out here.
Other useful links:
Python on Windows FAQ
Sumo, randomTrips.py
<configuration xmlns:xsi="http://www.w3.org/2001/XMLSchema-instance" xsi:noNamespaceSchemaLocation="http://sumo.sf.net/xsd/sumoConfiguration.xsd">
<input> <net-file value="tfs.net.xml"/> <route-files value="tfs.rou.xml"/> <additional-files value="tfs.poly.xml"/> </input>
<time> <begin value="0"/> <end value="1000"/> <step-length value="0.1"/> </time></configuration>
7. Finally, enter sumo-gui
 |
| 7 files will be created from all the steps above |
Disclaimer: This post is based on a very helpful SUMO tutorial on Linux . Check it out here.
Other useful links:
Python on Windows FAQ
Sumo, randomTrips.py
No comments:
Post a Comment