After a long wait, I finally finish downloaded all Frasier show. This is a great sitcom, it's just funny and enriches my vocabulary along the way. But I can't find any subtitle source that sync perfectly. I can live without the subs for a season or two, but I have 9 seasons without subtitles (season 3 - 9). I know I'm gonna miss a lot, especially with Frasier and Niles way of speaking. Long story short, I checked out subscene.com, addic7ed.com and tvsubs.net, but they all having the exact same version that out of sync. Some video and audio can be easily synced by just tweak the delay once or twice throughout the movie, but no this time, I have to re-sync every line of the text. Kinda pointless I say. After a short google, I found the perfect apps to re-sync sub easily and SAVES it =)
Let me introduce you the awesome SubFix. In only takes 5 easy steps to watch your movie with perfect sub.
This blog is about a postgraduate student's journey (Started 5th Sept 2014; Viva Voce 24th Aug 2020)
Wednesday, February 24, 2016
Tuesday, February 23, 2016
Control Structure in Swift
We usually used the common control structure in our programming. This post will cover 3 basic common structure in Swift; if else, for loop and while loop
if else
Eg: Create a program that checks if the user enter the correct password for a particular user.
var name = "Ange"
var pw = "password"
if name == "Ange" && pw == "password" {
print("Welcome " + name + ", you have entered the correct password")
}
else if name != "Ange" && pw != "password" {
print("You have entered the wrong username and wrong password")
}
else if pw != "password" {
print("You have entered the wrong password")
}
else {
print(("You have entered the wrong username")
}
 |
| if else statement |
for loop
Eg1: Print even number from 1 to 10
for var i = 2; i <= 10; i = i + 2 {
print(i)
print("\n")
}
Eg2: Create an array and divide all the elements in array by 2. Print the result.
var myArray = [2, 4, 8]
for [index, value] in enumerate(myArray} {
myArray[index] = value / 2
}
print(myArray)
for var i = 2; i <= 10; i = i + 2 {
print(i)
print("\n")
}
 |
| for loop |
Eg2: Create an array and divide all the elements in array by 2. Print the result.
var myArray = [2, 4, 8]
for [index, value] in enumerate(myArray} {
myArray[index] = value / 2
}
print(myArray)
 |
| for loop to access elements in an array |
while loop
Monday, February 22, 2016
Create Video from Still Images using iMovie 10.0.5
I wanted to create an animation of tailgating vs smooth cruising driving from still images. After search around, the free alternative for a Mac user like me is iMovie. I can't find much tutorial for the new iMovie in Mavericks, so I thought I should put one up here.
The most important thing here is to prepare your still images. I miss Paint in Windows system, but the next best option I have for Mac is Preview. Check out here how I prepare my still images.
Steps:
1. Lauch iMovie
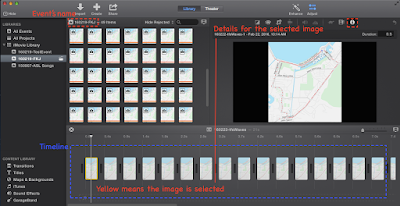
So many buttons. You can see on the left panel, All Events and All Projects. It was quite confusing for me at first. What do I want to create here? A movie? project? or event? 'Events' are kinda like the main folder/categories for the movies you created. Projects are all the stuff you have created in iMovie, basically your movies. Feel free to correct me if I'm wrong =)
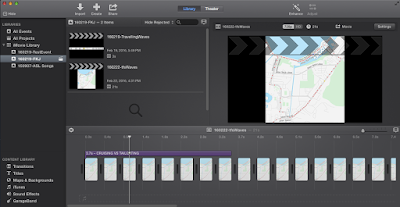
In this figure below, I have an event called 160219-FKJ, I will saved all movies created for my research purpose under this event.
Step 2: Import images
Step 3: Create movie
Step 4: Adding images to the movie
Step 7: Test movie
I hope this helps and feel free to comment below. Thanks.
Some remarks:
The most important thing here is to prepare your still images. I miss Paint in Windows system, but the next best option I have for Mac is Preview. Check out here how I prepare my still images.
Steps:
1. Lauch iMovie
So many buttons. You can see on the left panel, All Events and All Projects. It was quite confusing for me at first. What do I want to create here? A movie? project? or event? 'Events' are kinda like the main folder/categories for the movies you created. Projects are all the stuff you have created in iMovie, basically your movies. Feel free to correct me if I'm wrong =)
Eg: I went to Taiwan last May 2015. So I may create an event named 201505-Taiwan. Under the event 201505-Taiwan, I may have create movies such as: 150513-Taipei101.mp4, 150514-TaipeiZ00.mp4, 150515-RaoHeNightMarket.mp4.
In this figure below, I have an event called 160219-FKJ, I will saved all movies created for my research purpose under this event.
 |
| iMovie 10.0.5 |
Step 2: Import images
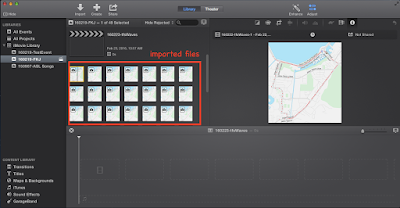
Once you have created/choose the event, then we can import the still images for our movie. Click on the button Import at the top and navigate to your images. If you have lots of images, I would suggest to name your files accordingly. I have certain naming conventions for all the 49 images below.
 |
| Import still images |
Step 3: Create movie
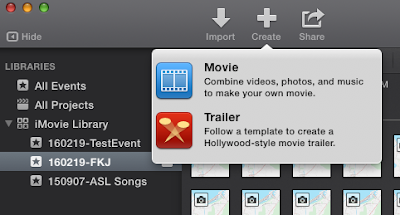
Now we can create our movie. Simply click on the '+' button at the top. I usually choose no theme for a simple academic animation.
 |
| Create movie |
Step 4: Adding images to the movie
You can drag the imported images to the timeline below. But make sure you know which image is which. When you selected an image in the timeline, the info of the selected image will show on the right panel. If you can't see this, click on 'adjust' --> 'circled-i'. In my case, I will drag the images accordingly(160222-tfsWaves-1 to 160222-tfsWaves-49)
Step 5: Cropping style
Once you have selected all the images, Select-All (Ctrl-A) to set the size of your images. By default the cropping style is set to 'Ken Burns'. I'm just gonna change all to 'Fit'. You can play around to see what style fits your movie
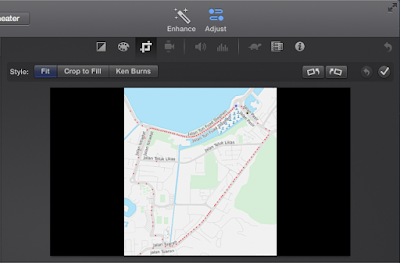 |
| Cropping style |
Step 6: Setting frame duration
To set your frame duration, Select-All (Ctrl-A), click on the circled-i on top. You can set as fast as 0.3 secs per image( that's the lowest you can go). I'm just gonna set mine 0.5.
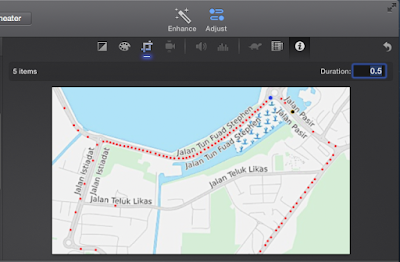 |
| Setting frame duration |
Step 7: Test movie
You can start playing the movie from start or any sections you want. At the timeline, simply bring the vertical lines to the position you want and hit Spacebar (to start or pause).
Step 8: Save movie
Once you are satisfied, click on the 'share' button. I'm just gonna choose to save it as a file on my desktop.
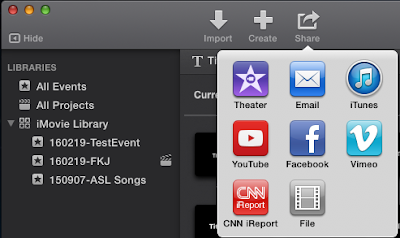 |
| Share/save movie. |
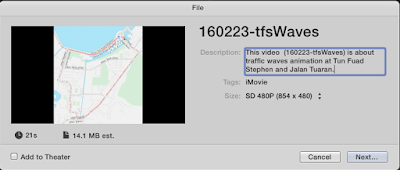 |
| Add description and select movie size |
That's it. Voila! You can use the same steps for adding/combining videos too. Of course there are many other things you can add in iMovie, but once you get familiar with the interface, the rest pretty straight forward. It wasn't that hard actually, but it put me off for few years from using it.
I hope this helps and feel free to comment below. Thanks.
Some remarks:
Some other basic features you might need are at the lower left panel.
- Transitions - Some nice effect for images/videos transitions
- Titles - Titles
Subscribe to:
Posts (Atom)

