Thursday, April 30, 2015

Fixing double-click in Logitech M310

I'm quite particular with my mouse (yes for laptop), the body need to be curvier, no tail, matte, not look too geeky, just right pressure for clicking, laser and etc. but recently my Logitech wireless mouse started to show symptom of accidental double-clicking. This is quite annoying when I used the scroll click to open a link in a new tab, it will open same link on two tab. I don't want to invest in another laser wireless mouse again, I still have the old one that just suddenly died and when I got the Logitech mouse, suddenly it came back alive. So, I'll just try to fix this left-click, after few googling..

Tools: penknife, phillip screwdriver

Steps:
1. Remove the batteries

2. Remove the screws (2 screws only, easily accessible. Some models have four screws to hold the mouse body together, hidden underneath the slide pads)

3. Slowly lift off the top cover, gaming model could have wire connected to the top cover.

4. Locate the problematic click mechanism. Mine is the left-click. Notice the white tiny button on the top cover. This will easily fall loose when the cover is removed. Use a masking tape to keep the white button attach to the cover before you pry the box cover away from the latch.


5. Locate the copper tension spring. We want to re-tension the copper spring, remove it from the click mechanism, I just used my fingers to make the curve and bending up. 

6. Re-install back the copper spring. This will be the HARDEST/ CRAZIEST step. It took me an hour to figure out how to put it back.


6.1)  At point 2, set the curve tab into place
6.2)  Slowly lift the copper spring abit, keeping the curve tab in point-2, attach the point-1 to the small hook at the front of the mechanism 
6.3)  keeping the copper spring at point-1 and point-2, slowly slide down the rear of the spring under the small arm at point-3. 
Make sure all the three points installed correctly, else it wont work.

7. Reassemble the black top cover, make sure the tiny white button still in place. Try few clicks on the tiny white button before mounting back the mouse top. You should notice a crisp click sound, just like your right-click. If you noticed no difference, you may need to re-tension the spring again. 

8. You also may check any sign of worn out on the tiny white button that make it harder to click. I fixed this by attaching a small piece of card(thicker) or plastic on the tiny white button. 


Remarks:

  1. Step 6 seriously need a big spoonful of patience.
  2. I did few trial and error in step 8 to get the optimum 'height' for my left click. If your card/plastic is too thick, your clicking will be too sensitive.

Mr. Ho's Fine Food @ KK Times Square

I have always wanted to try out the grilled stuff here at Mr. Ho's. Although the place name kinda like a Chinese restaurant, but it's a total western and kinda Germany food with sausages. We got the voucher from groupon for RM48/pax. It's a buffet style with complimentary ice lemon tea and pumpkin soup. Every time I go for buffet, I'll try to capture the memory of my guilty pleasure number of plates I had 😵. Anyway it was a nice evening with my ex-colleague, tasty food and cool atmosphere.

Food diary from that evening..


The pumpkin soup can be creamier, maybe some sour cream would be tastier. Not much selection of food, but the pork rib was marvellous, and the prawn too.. Overall everything was good. Will come again.


Wednesday, April 29, 2015

Windows Pop up - Do you want to allow the following program to make changes to your computer

One of the annoying pop-up in Windows

"Do you want to allow the following program to make changes to your computer"

This alert pop-up everytime I open a word document, whether the answer is yes or no, the pop up continue with another " There was a problem sending the command to the program".


Fix:

Firstly, verify that Word isn't being automatically started within Admin Mode
Right Click on the word exe file ->Properties->Compatibility Tab->Privilege Level. 
Check Run as Administrator is unchecked.

If it already is, or this doesn't rectify the issue, check Microsoft Office Compatibility.
  1. Open Microsoft Office Properties
  2. On Compatibility Tab, check the Compatibility mode is set to your operating system. Mine by default is set to Windows (SP3). Change to Windows 7


Thursday, April 23, 2015

Running Java code and setting its environment variable in Windows 7

You may download Java Development Kit here. Accept the license agreement and choose your system. I'm using Windows x64 (for 64 bit, you may also choose Windows x86 to run 32 bit system)


Setting Windows 7 environment variable for Java
To do this:
  1. Open system properties
  2. Advanced system settings
  3. Click on environment variables @ bottom right 
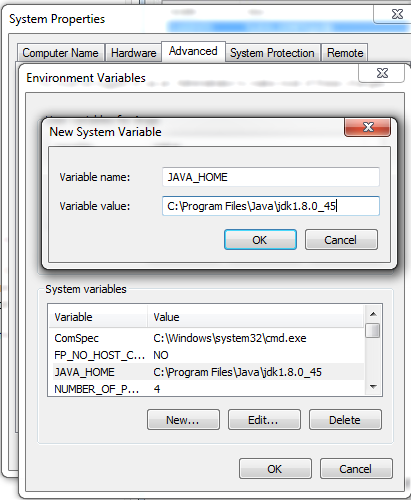
  4. Click 'New' to create new system variable (Variable name: JAVA_HOME, Variable Value: C:\Program Files\Java\jdk1.8.0_45), then click 'ok'.
  5. In system variables, scroll down and look for "path"
  6. Edit the path by append ";%JAVA_HOME%\bin"
  7. Restart cmd
Step 4: Create new system variable

Step 6: Append the path

Tuesday, April 7, 2015

MacFan For Windows Temperature Control in Bootcamp

This apps is simple and useful to control the speed of your fan in bootcamp. Apparently the fan control in Windows Bootcamp is not as good as in OSX.

2 apps to download:

  1. Core Temp - for temperature readings
  2. MacFan - to set the fan speed (run as admin in comand prompt)

Steps:
1. Extract the MacFan zip file.
2. Run cmd as admin
3. Navigate to MacFan directories in cmd (my MacFan folder located in Downloads folder)
Downloads\MacFan0_65\MacFan0_65\MacFan0_65\MacFan.exe
You can see the number of fan you have, and the minimum and maximum fan speed. In my case, I have 1 fan, min of 2000 rpm and, max of 6200 rpm.
1 fan, min=2000 rpm, max= 6200 rpm

4. Now we want to set our fan speed manually (press arrow up, for previous command), say 3000 rpm

Downloads\MacFan0_65\MacFan0_65\MacFan0_65\MacFan.exe 3000

Setting fan to 3000 rpm


That's all!

Remarks:

  1. Restarting your system will put the fan speed to default.
  2. At 3000 rpm my core temp was > 60 Celsius in idle. I reset the fan speed to 4000 rpm to keep the core temp below 60 Celsius (I run heavy image processing and simulation)